Creating your own cutting boards is not only a rewarding craft but also adds a personal touch to your kitchen. With some basic tools and materials, you can make beautiful and functional cutting boards that will last for years. Follow this step-by-step guide to learn How to Make Cutting Boards that impress.
Materials Needed
- Hardwood (such as maple, walnut, or cherry)
- Wood glue
- Clamps
- Sandpaper (various grits: 80, 120, 220)
- Food-safe mineral oil or wood finish
- Measuring tape
- Table saw or circular saw
- Router (optional, for rounded edges)
- Cutting board feet (optional)
Step-by-Step Guide
Step 1: Choose Your Wood
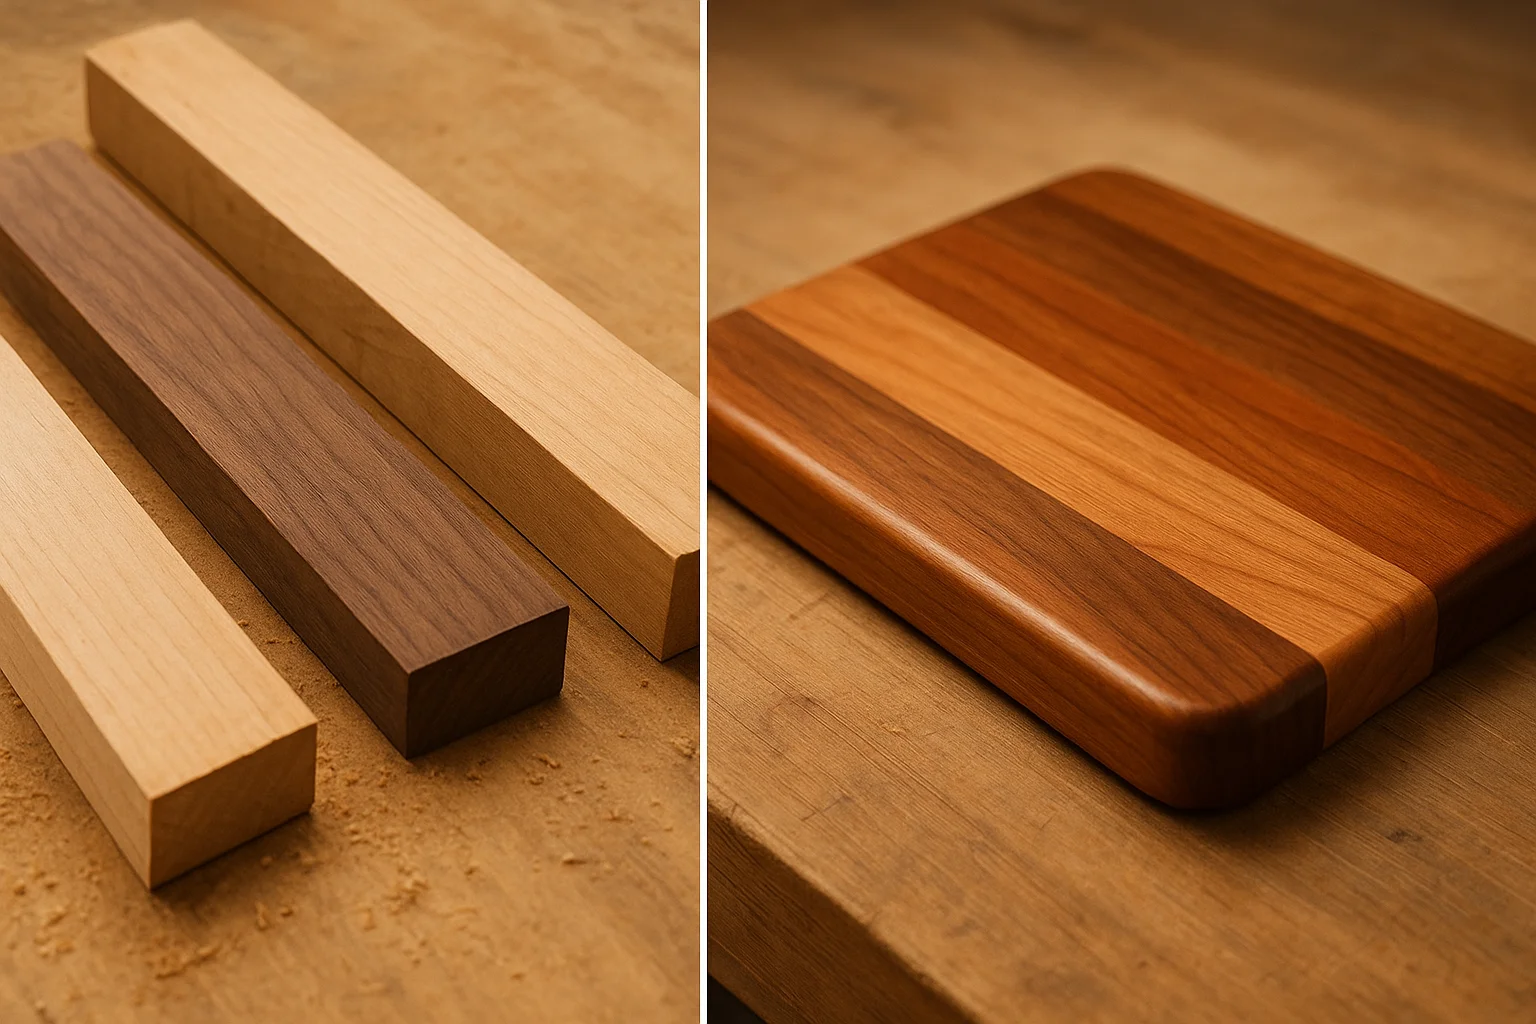
When learning How to Make Cutting Boards, the first step is choosing the right material. Opt for hardwoods that are durable and less porous. Maple is a popular choice due to its hardness and resistance to bacteria. Walnut offers stunning grain patterns, while cherry adds warmth. Choose pieces that are free from knots or cracks for the best results.
Step 2: Measure and Cut the Wood
Decide on the dimensions of your cutting board. A common size is 18 x 24 inches. Using a measuring tape, mark the wood and cut it to size with a table saw or circular saw.
Step 3: Glue the Pieces Together
If you want a larger cutting board, you may need to glue several pieces together. Apply a thin layer of wood glue to the edges of the pieces, press them together, and use clamps to hold them in place. Wipe away any excess glue with a damp cloth. Allow the glue to cure as per the manufacturer’s instructions, usually overnight.
Step 4: Sand the Surface
Once the glue is fully dry, it’s time to sand the board. Start with 80-grit sandpaper to remove any glue residue and smooth out the edges. Follow up with 120-grit, and finish with 220-grit sandpaper for a smooth surface. Sand in the direction of the grain to avoid scratches.
Step 5: Shape and Finish
If you want rounded edges, now is the time to use a router. Round off the corners to create a softer look. After shaping, give the board a final sand to ensure a refined finish.
Step 6: Apply Food-Safe Finish
To protect your cutting board and enhance its beauty, apply a food-safe mineral oil or wood finish. Pour a small amount onto the surface and use a cloth to spread it evenly. Allow the oil to soak in, and wipe off any excess after a few hours. Repeat this process several times until the wood is saturated. Regular maintenance with oil keeps your board looking new.
Step 7: Add Feet (Optional)
If you’d like to prevent slipping and protect countertops, consider adding rubber feet on the bottom of the board. This not only adds stability but also elevates the board for easier cleaning.
Step 8: Enjoy Your Cutting Board
Your homemade cutting board is ready for use! Whether chopping vegetables, slicing bread, or serving cheese, this cutting board is both functional and artistic. Remember to wash it with mild soap and water, and avoid soaking it in water to maintain its integrity.
Care and Maintenance Tips
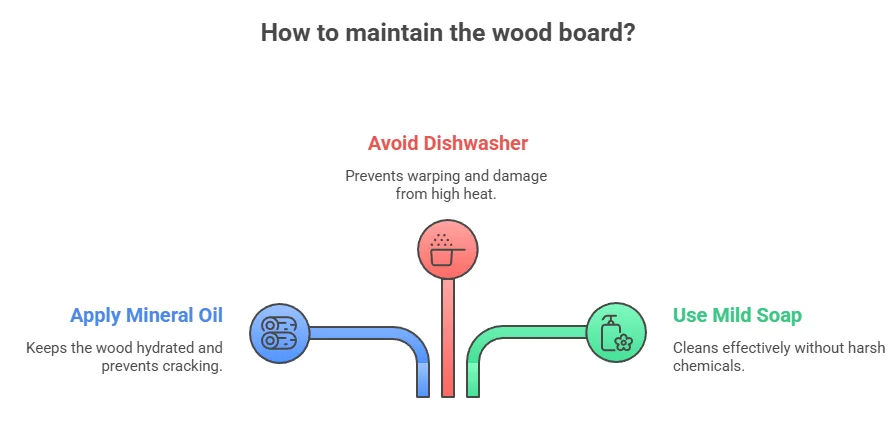
- Regularly apply mineral oil to keep the wood hydrated.
- Do not put the board in the dishwasher.
- Clean with mild soap and avoid harsh chemicals.
For more woodworking ideas and techniques, visit Wood Magazine or explore cutting board designs at Popular Woodworking.
By following these steps, you can craft a beautiful cutting board personalized to your style. Dive into this project and enjoy the satisfaction of working with wood to create something both practical and beautiful!
The Best Wood Types for Crafting Durable Cutting Boards
Choosing the right wood type for crafting durable cutting boards is crucial. Different woods have unique properties that make them suitable or unsuitable for kitchen tasks. Understanding these characteristics is a key part of mastering How to Make Cutting Boards that last.
Hardwoods vs. Softwoods
When selecting wood for cutting boards, it’s essential to understand the difference between hardwoods and softwoods. Hardwoods come from deciduous trees and are generally denser and more durable. Softwoods, from coniferous trees, tend to be less dense, making them more susceptible to wear and tear.
Top Wood Types for Durable Cutting Boards
Here are some of the best hardwoods to consider when crafting your cutting boards:
- Maple: Sugar maple is a classic choice. It offers excellent durability and a fine grain that resists knife markings.
- Walnut: Walnut is known for its rich color and beautiful appearance. It is softer than maple but still provides good durability.
- Cherry: This wood develops a lovely patina over time. It has a medium hardness that offers a good balance for cutting boards.
- Bamboo: Although technically a grass, bamboo is a hard, sustainable option. It’s eco-friendly, lightweight, and resists knife marks well.
- Teak: Teak is naturally oily, making it resistant to moisture and germs, which is perfect for a cutting board that will see frequent use.
Key Considerations When Choosing Wood
When selecting wood for your cutting board, consider the following factors:
| Wood Type | Durability | Knife-Friendly | Maintenance Needed |
|---|---|---|---|
| Maple | High | Very Knife-Friendly | Periodic Oiling |
| Walnut | Moderate | Knife-Friendly | Periodic Oiling |
| Cherry | Moderate | Knife-Friendly | Periodic Oiling |
| Bamboo | High | Moderately Knife-Friendly | Little Maintenance |
| Teak | Very High | Knife-Friendly | Periodic Oiling |
Understanding Wood Grain
The grain of the wood plays a role in its overall performance as a cutting board. End grain boards, with their fibers oriented vertically, tend to be more durable and easier on knives compared to edge grain boards. Considering the grain direction when crafting your board can enhance its longevity.
Finishing Touches
Once you’ve crafted your cutting board, applying a food-safe finish is essential. Mineral oil or beeswax are popular choices. They not only protect the wood but also enhance its appearance and help prevent moisture absorption. Regular maintenance with these finishes can significantly extend your board’s life.
Why Cutting Boards Matter
Using the right cutting board is important for food safety and knife preservation. Certain woods have natural antibacterial properties, which help keep your food prep sanitary. Opting for a quality hardwood cutting board can also prevent knife dulling and make for a better cutting experience.
Essential Tools and Materials Needed for Cutting Board Projects
Creating your own cutting boards can be a rewarding experience. Not only do you get to customize them to your liking, but you also engage in a practical, hands-on project. To ensure your cutting board project goes smoothly, it’s essential to have the right tools and materials at your disposal. Below is a guide detailing everything you’ll need when learning How to Make Cutting Boards.
Basic Tools for Cutting Board Projects
First, let’s look at the fundamental tools you’ll need to create your cutting board:
- Hand Saw or Circular Saw: A hand saw is perfect for smaller projects, while a circular saw makes cutting larger sheets of wood more manageable.
- Jigsaw: Essential for making intricate cuts or curves in your cutting board design.
- Sander: An electric sander helps smooth out the board’s surface and edges. A sanding block can also work well if you prefer a manual option.
- Drill: Useful if you plan to add handles or other features that require holes for screws.
- Clamps: These keep your wood pieces securely in place while you work.
- Measuring Tape: Accurate measurements are crucial for a well-fitted cutting board.
- Square: A framing square or speed square helps ensure your angles are precise.
- Workbench or Saw Horses: A sturdy surface to support your wood is important for safety and accuracy while cutting.
Materials for Cutting Board Construction
Next, let’s discuss the materials you will need for crafting your cutting board. Choosing the right wood is key to making a beautiful and durable board.
- Wood Type: Hardwoods like maple, walnut, and cherry are ideal because they are durable and have a tight grain, which resists moisture and bacteria. Avoid softwoods like pine because they can scar easily and may harbor more bacteria.
- Wood Glue: A strong, food-safe wood glue is important for joining different pieces of wood together.
- Mineral Oil or Beeswax: These are used for finishing your cutting board. They help seal the wood and enhance its natural beauty.
- Sandpaper: Various grits, from coarse (80-120 grit) for initial sanding to fine (220 grit) for finishing touches.
- Finish (Optional): Food-safe finishes, such as varnishes or oils, can be used if you want added protection against moisture.
Safety Gear
Safety should always be a priority when working with tools. Here are some safety gear essentials:
- Safety Glasses: Protect your eyes from flying debris when cutting or sanding wood.
- Dust Mask: Keep dust out of your lungs, especially when sanding.
- Ear Protection: If you’re using power tools, consider wearing ear protection to shield your hearing from loud noises.
- Work Gloves: Gloves can help protect your hands from splinters and cuts.
Teaming Up with Resources
Your cutting board project can be enhanced further by utilizing online resources. Websites like Wood Magazine provide detailed tutorials and plans. For safety tips and guides, check out Woodworker’s Journal. You can also find helpful community forums where experienced woodworkers offer advice.
In addition, consider visiting local hardware stores or woodworking supply shops for materials and tools. They can provide personalized recommendations and possibly even workshops to improve your skills.
With the right tools and materials, you are now ready to embark on your cutting board project. Make sure to take your time, measure twice, and most importantly, enjoy the process. Crafting something with your own hands brings a sense of accomplishment like no other.
Tips for Maintaining and Caring for Your Cutting Boards
Cutting boards are essential tools in any kitchen, but they need proper care to remain in good condition. With the right maintenance, you can extend the life of your cutting boards and keep them looking great. Here are some practical tips to help you care for your cutting boards effectively.
Cleaning Your Cutting Boards
Regular cleaning is vital for maintaining your cutting boards. Here’s how to do it properly:
- Wash Immediately: After using your cutting board, wash it right away to prevent stains and odors. Just use hot, soapy water.
- Avoid Soaking: Do not soak your cutting board in water. This can cause warping and damage the board.
- Use Separate Boards: If you prepare raw meat, fish, or poultry, keep a separate board for these items to avoid cross-contamination.
- Sanitize: To sanitize your cutting board, you can use a mixture of one tablespoon of bleach to one gallon of water. Wipe down the surface with this solution and rinse thoroughly.
Drying Your Cutting Boards
After washing, drying your cutting board is equally important:
- Air Dry: Always air dry your boards by placing them upright in a dish rack or on a clean towel.
- Do Not Use a Dishwasher: Avoid putting wooden cutting boards in the dishwasher. The heat and moisture can cause the wood to crack and warp.
Oiling Your Cutting Boards
Oiling is a crucial step for wood cutting boards, as it keeps the wood nourished and prevents it from drying out:
- Choose the Right Oil: Use food-grade mineral oil or butcher block oil. Avoid using vegetable oils as they can go rancid.
- Frequency: Oil your cutting board at least once a month, or more often if it seems dry.
- How to Apply: Apply a generous amount of oil with a clean cloth and let it soak in for at least an hour. Wipe off any excess.
Avoiding Damage
Taking steps to avoid damage can save your cutting boards from wear and tear:
- Use a Cutting Mat: Consider using a cutting mat on top of your wooden board to reduce scratches.
- No Heavy Knives: Avoid using heavy knives or cleavers that can gouge the surface.
- Store Properly: Store your cutting boards in a place where they won’t be knocked over or scratched by heavy kitchen items. A dedicated space in a cupboard or on a countertop works best.
Regular Inspections and Restoration
Inspect your cutting boards routinely for signs of wear. Look for cracks or deep grooves that could harbor bacteria. Even with excellent care, your cutting boards may need restoration over time. If your board has scratches or dull spots, lightly sand it with fine-grit sandpaper (always sand in the direction of the wood grain), then clean the surface and apply a fresh coat of oil.
Useful Resources
For additional information on maintaining your cutting boards, check out the following websites:
Creative Designs and Techniques to Personalize Your Cutting Boards

Cutting boards are essential tools in any kitchen, but they can also be a canvas for your creativity. Personalizing your cutting board not only enhances its aesthetic appeal but also makes for a unique gift for family and friends. When you know How to Make Cutting Boards, you can utilize several creative designs and techniques to transform a basic board into a personalized masterpiece.
Choosing the Right Material
Before starting your design journey, picking the right material is crucial. Common materials for cutting boards include:
- Wood: Offers a classic look and is easy to engrave.
- Bamboo: A sustainable option that is gentle on knife edges.
- Plastic: Affordable and easy to clean, but harder to personalize.
- Glass: Provides a sleek, modern appearance, although not ideal for heavy chopping.
Design Techniques to Explore
Once you’ve chosen your material, consider the following techniques to personalize your cutting board:
Engraving
Engraving is a popular way to add custom text or patterns. You can use a laser engraver for precise results, hand engrave using a Dremel tool for a more personalized touch, or use stencils for detailed designs or lettering.
Wood Burning
Wood burning, also known as pyrography, allows for intricate designs on wooden boards. Use a wood-burning pen to create your design, practice on scrap wood before working on your board, and combine different technique strengths for varying depths.
Painting
Adding color can dramatically change the look of your cutting board. Options include food-safe acrylic paints for vibrant designs or chalk paint for a matte finish. Always seal with a food-safe finish to protect your artwork.
Personal Elements
Your cutting board can tell a story. Here are ideas to make it personal:
- Monograms: Add initials or family names to make it unique.
- Quotes: Choose a meaningful cooking or family quote.
- Date: Commemorate a special occasion, like a wedding or housewarming.
Where to Find Inspiration
Need more ideas for your personalized cutting board? Consider these resources:
- Pinterest: A treasure trove of creative designs.
- Etsy: Find custom cutting boards for inspiration or purchase.
- Instagram: Follow hashtags like #cuttingboarddesign for new ideas.
Making your cutting board a reflection of your personality is an exciting project. With the right materials and techniques, you can transform an ordinary kitchen tool into something special and memorable.
Maintaining Your Personalized Cutting Board
To ensure the longevity of your beautifully designed cutting board, maintenance is key. Follow these practices:
| Action | Description |
|---|---|
| Cleaning | Hand wash with soapy water and dry immediately. Avoid dishwashers. |
| Oiling | Apply mineral oil monthly to keep the wood from drying out. |
| Storage | Store upright in a dry place to avoid moisture accumulation. |
Conclusion
Creating your own cutting boards can be a rewarding and enjoyable experience. By following the step-by-step guide we’ve shared, you can develop skills and craft beautiful, functional pieces for your kitchen. Choosing the right wood type is crucial for durability and aesthetics, with options like maple, walnut, and cherry offering excellent choices.
The satisfaction of learning How to Make Cutting Boards and using a piece you’ve crafted yourself adds an extra layer to cooking and entertaining. Plus, these boards make thoughtful, handmade gifts for friends and family. So grab your tools, get inspired, and start your journey into woodworking—you’ll be amazed at what you can create!